Network & Security Home Lab:

Posted June 17, 2024
Part 4 - pfSense Firewall configuration
pfSense General Configuration Web Portal Setup
First start your pfSense firewall
Now we can start our Kali Linux VM
On the Kali Linux VM, open the web browser and navigate to https://10.0.0.1.
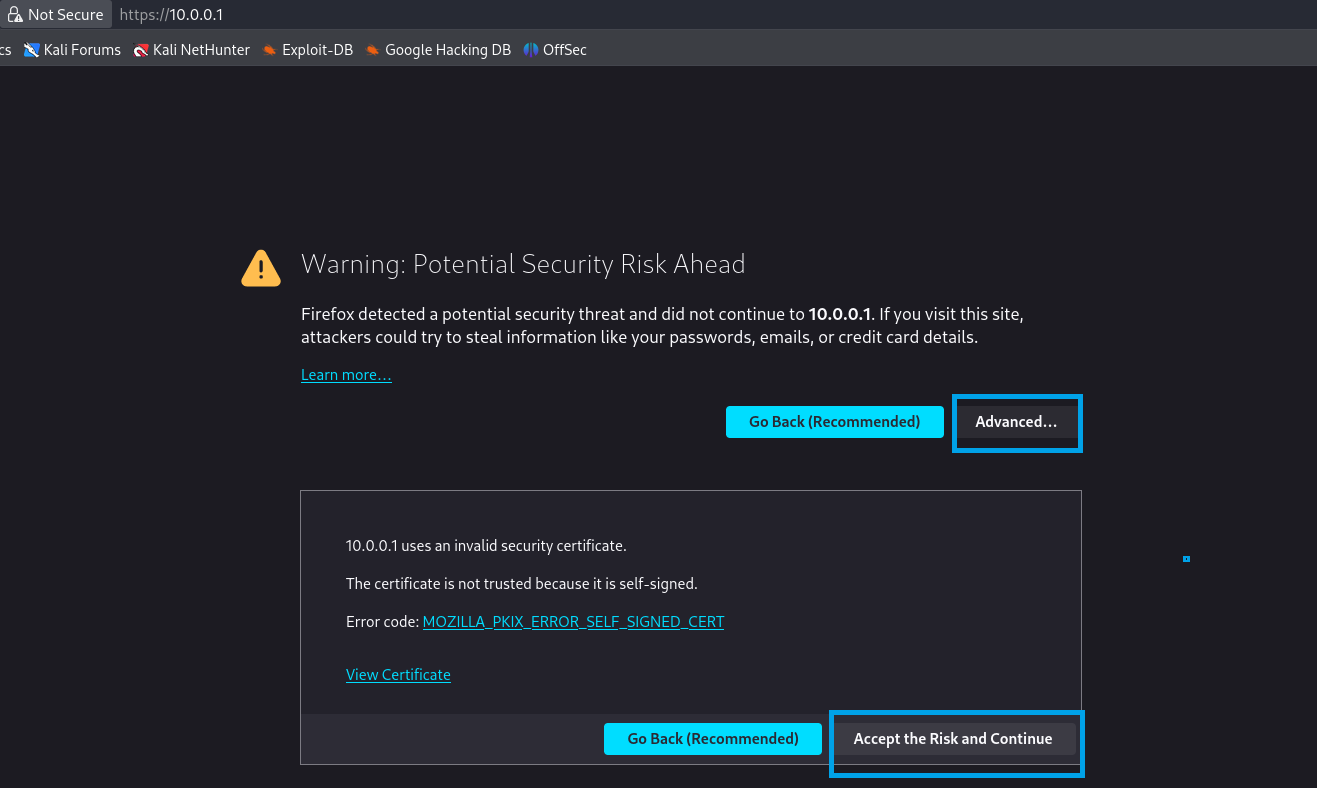
You will get the following message Warning: Potential Security Risk Ahead. This warning can be ignored in this case.
We are getting this warning because the URL that we are trying to access does not use HTTPS (secure HTTP). Click on Advanced and then click on Accept the Risk and Continue.
This url is opening the pfSense Web UI login page.
Logging in will require using the default credentials.
Username: admin Password: pfsense
Once logged in the next 2 pages are introductory.
Click on Next.
Click Next again.
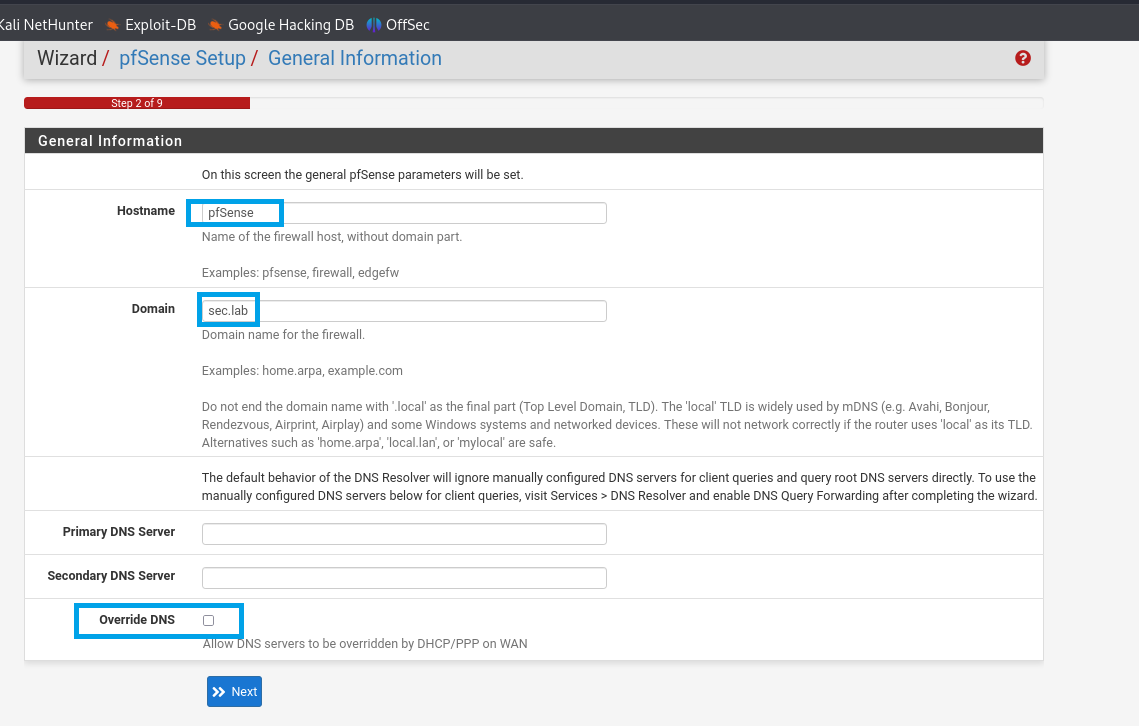
In the General Information section. Provide a Hostname and Domain name. This can be any name you choose. The hostname can be used to identify the pfSense VM on the network. Uncheck the Override DNS option and then click Next.
Select your Timezone and then click Next.

Configuring WAN interface
Scroll to the bottom of the page and look for the RFC1918 Networks section. Uncheck the Block RFC1918 Private Networks option.
We disabled this option because our WAN interface is not an real-life WAN interface. It uses an private IP address instead of an public IP address which would be used by a real WAN interface to connect to the Internet.
That is the only option we are changing on this page.
Click on Next
Configuring LAN interface
Don’t change any value on this page. Click on Next.
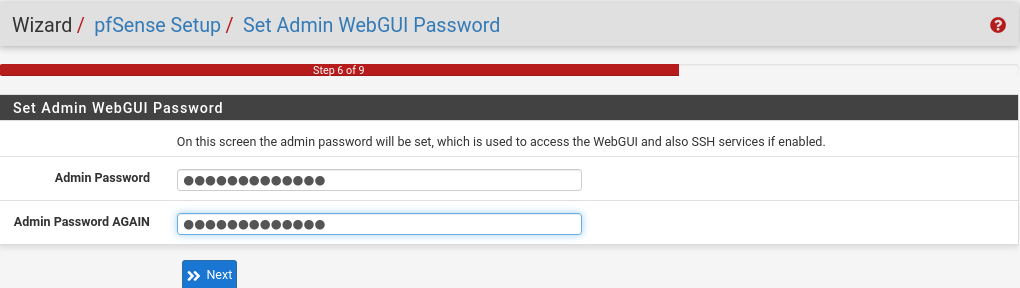
Enter a new password for the admin user. Store the password in a secure place.
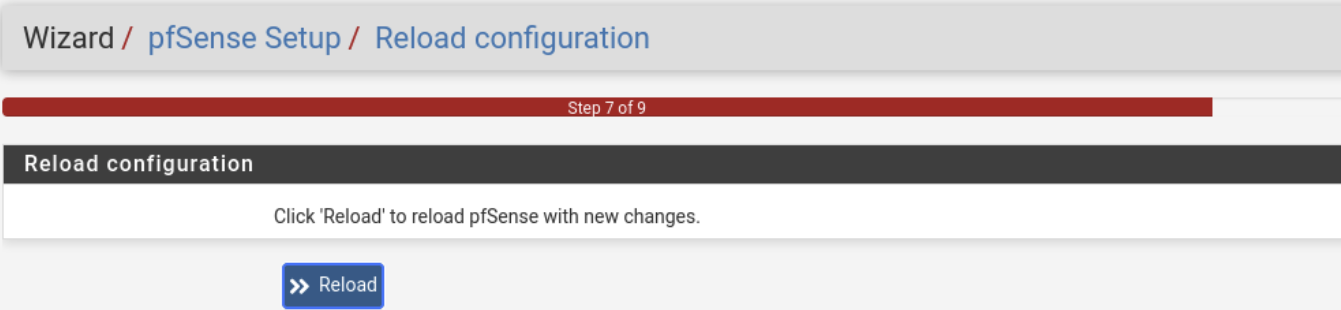
Click on Reload to apply the changes.
Click on Finish.
Once on this page, just hit Finish.
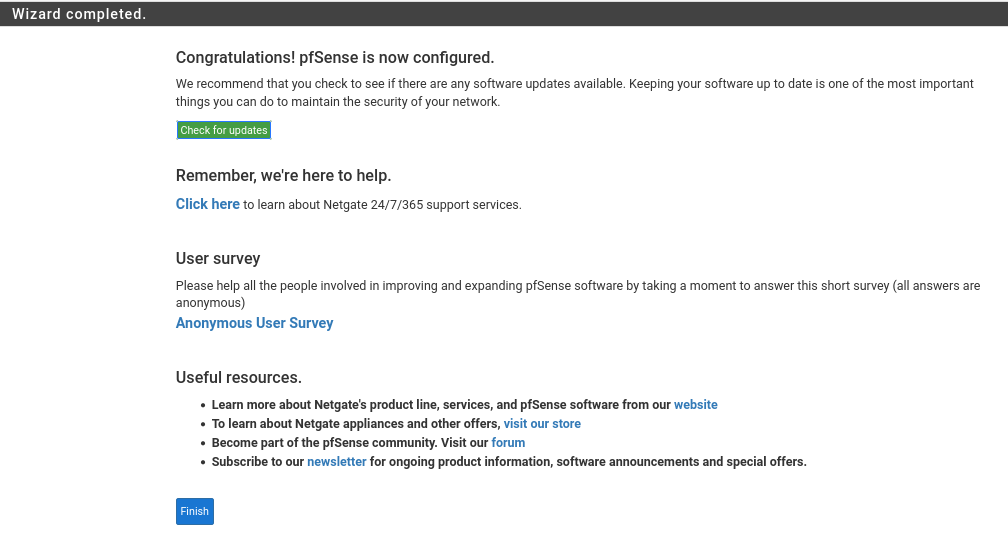
Once the copyright agreement is agreed to, we have access to the dashboard.
Interface Renaming
From the tool bar select Interfaces -> OPT1.
In the Description field enter CYBER_RANGE. Scroll to the bottom and click on Save.
Once saved, pfSense will ask you once again to confirm

At the top of the page, a new popup will appear.
Click on
Apply Changes.
From the navigation bar select Interfaces -> OPT2.
In the Description field enter AD_LAB. Scroll to the bottom of the page and click on Save. A popup will appear at the top of the page to confirm.
Click on
Apply Changes.

DNS Resolver Configuration
From the navigation bar select Services -> DNS Resolver.
Scroll to the bottom of the page,
enable DCHP Registration
enable static DHCP
scroll to the top of the page (save but dont apply changes!)

Click on Advanced Settings.
Scroll down to the Advanced Resolver Options section and enable the 2 pictured options. Scroll to the end and click on Save.

A popup will appear at the top of the page. Click on
Apply Changes.
Advanced Configuration
From the navigation bar select System -> Advanced.
Go to the Networking tab
Scroll to the bottom of the System/Advanced/Networking page, and in the Network Interfaces section and check the Hardware Checksum Offloading box. This will disable that option and should improve the performance of pfSense.
Click on
Save.

At this point a popup will appear click on OK to reboot pfSense.
Kali Linux Static IP Assignment
Once you have logged in again,
From the navigation bar select Status -> DHCP Leases.
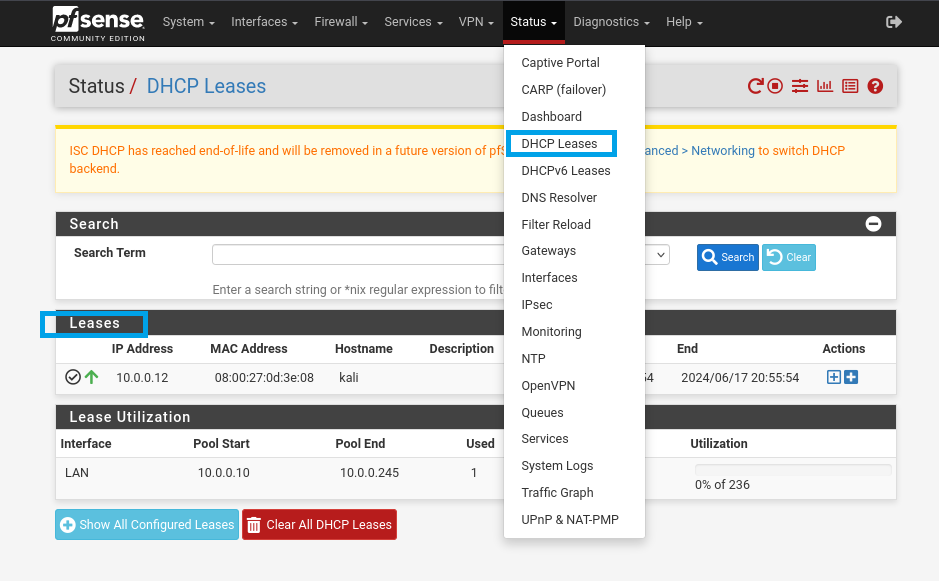
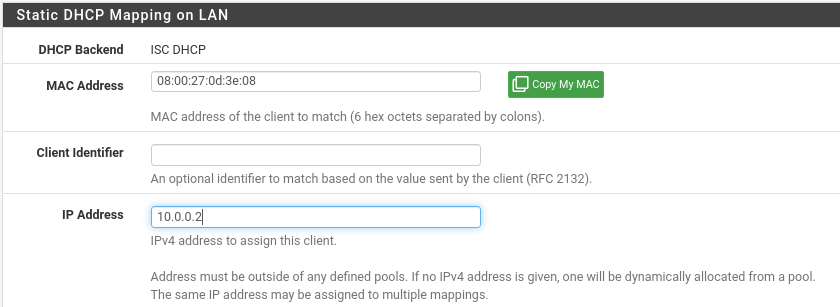
In the Leases section, we should see the Kali Linux VM with its current IP address. Click on the highlighted + icon to assign a static IP to Kali Linux. The static IP will make it easier for us to apply firewall rules to interfaces that should only be able to reach the Kali VM.

In the IP Address input enter 10.0.0.2. Scroll to the bottom and click on Save.
A popup will show up at the top of the page. Click on Apply Changes.
Refresh Kali Linux IP Address
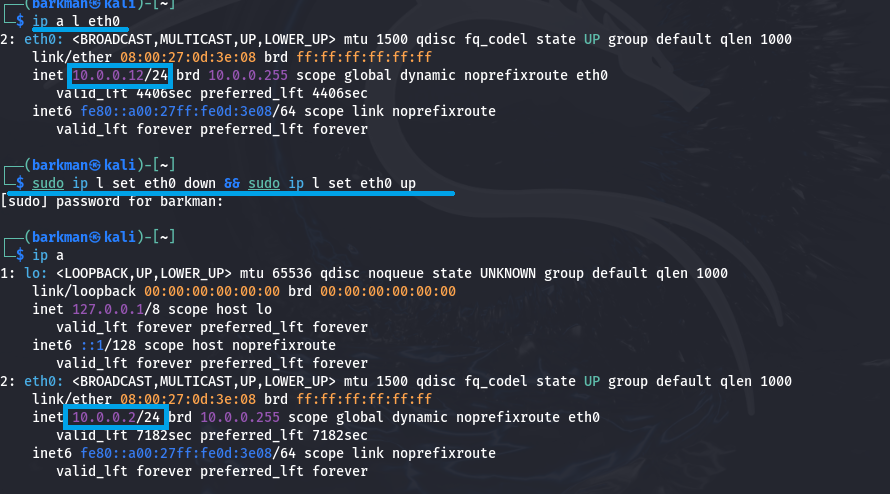
Open a terminal next. Use the following command to see the current IP address.
ip a l eth0
We want the VM to release the current IP address and use the static IP that was reserved. This can be achieved using the following command:
sudo ip l set eth0 down && sudo ip l set eth0 up
Enter password when prompted. To confirm that the VM is using the static IP run the following command:
ip a l eth0
pfSense Firewall Configuration: LAN Rules
Back to pfSense
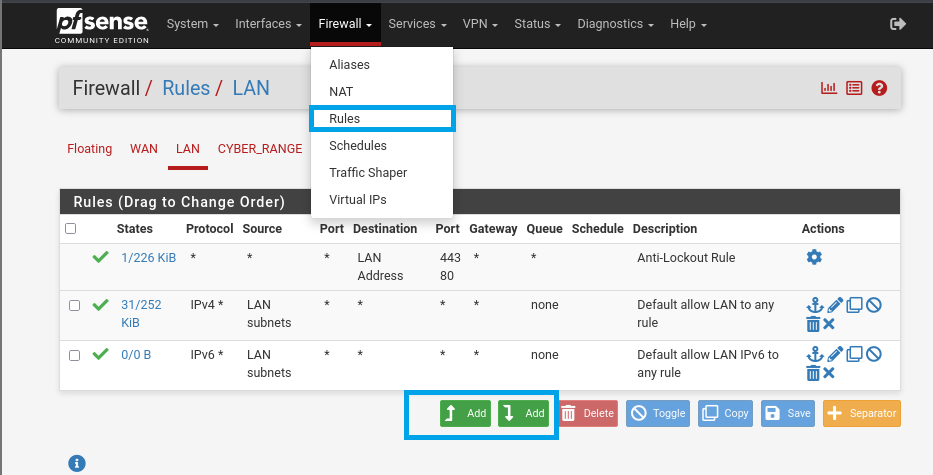
From the navigation bar select Firewall -> Rules -> LAN.
Go to the
LANtab. The LAN tab will have some predefined rules.
Click on the “Add rule to top” button to create a new rule.
Change the following options:
Action: Block
Address Family: Ipv4+IPv6
Protocol: Any
Source: LAN subnets
Destination: WAN subnets
Description: Block access to services on WAN interface
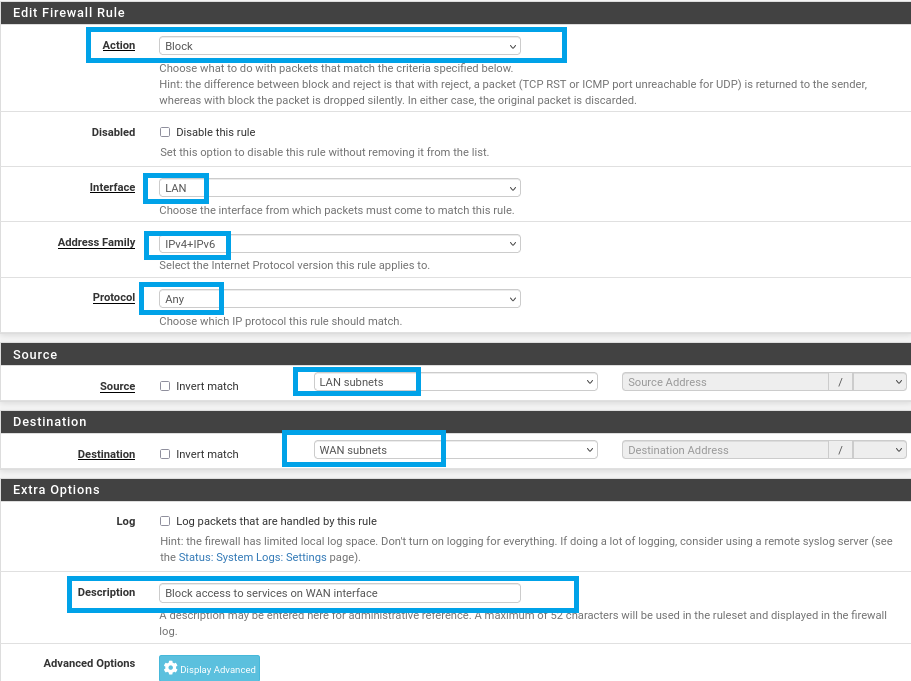
Scroll to the bottom and click on Save.
A popup will appear to confirm, you can now click on Apply Changes.
The final LAN rules should match the picture below.

If the order is not correct. Drag the rules around till it matches the above image.
CYBER_RANGE Rules
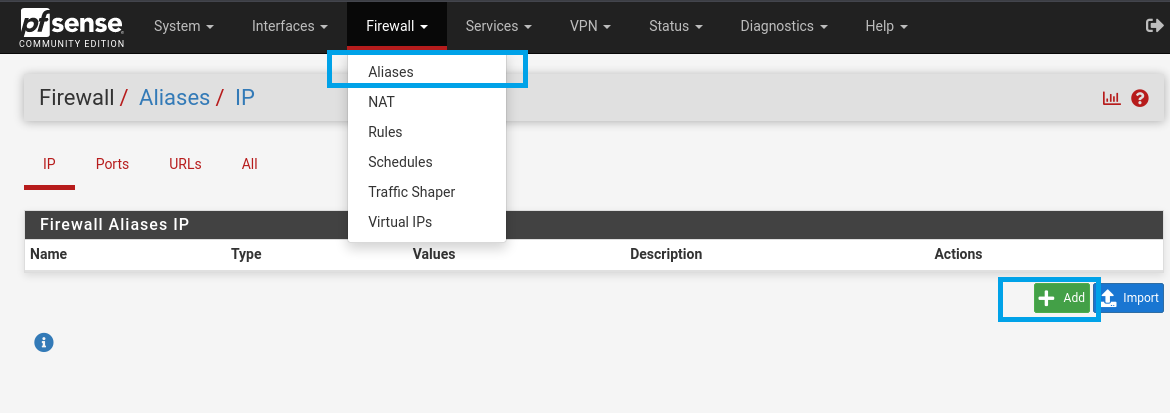
Before creating the rules for CYBER_RANGE we need to create a Alias. From the navigation bar select Firewall -> Aliases -> IP.
Once in the IP tab click on Add to create a new alias.
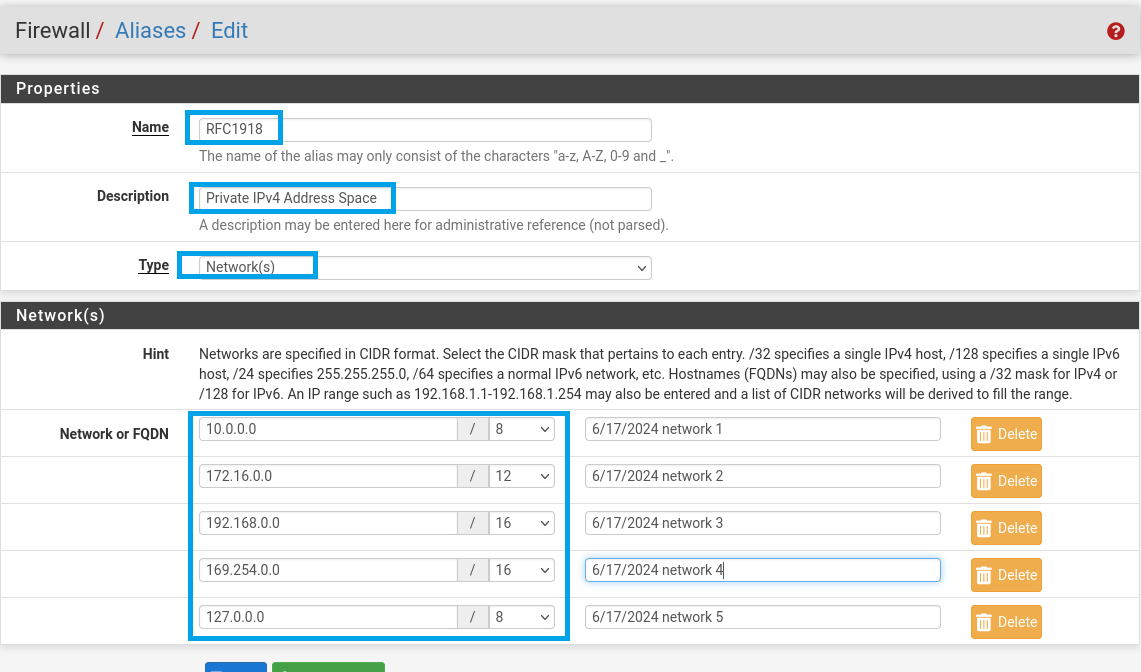
Enter the following details:
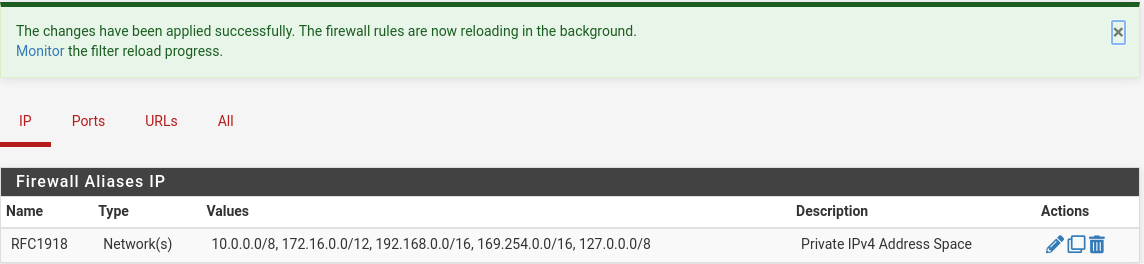
Name: RFC1918
Description: Private IPv4 Address Space
Type: Network(s)
Network 1: 10.0.0.0/8
Network 2: 172.16.0.0/12
Network 3: 192.168.0.0/16
Network 4: 169.254.0.0/16
Network 5: 127.0.0.0/8
Click on Save to create an alias.
A popup will show up to confirm, click on Apply Changes.
The final result should be as follows once applied:
From the navigation bar select Firewall -> Rules. Select the CYBER_RANGE tab.
Use the “Add rule to end” button for all the next rules.
There will be 4 rules added for this interface.
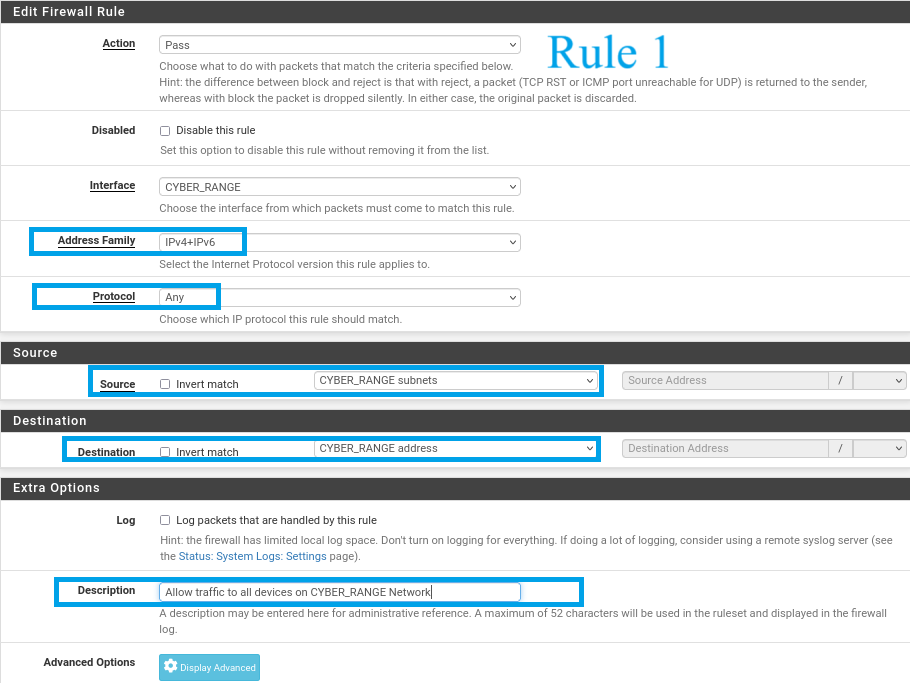
Rule 1
Configure the rule as follows: Address Family: IPv4+IPv6
Protocol: Any
Source: CYBER_RANGE subnets
Destination: CYBER_RANGE address
Description: Allow traffic to all devices on the CYBER_RANGE network
Scroll to the bottom and click on Save.
A popup will appear at the top to apply changes, though we will add the rest of the rules before applying changes.
Click on the “Add rule to end” button to create a new rule.
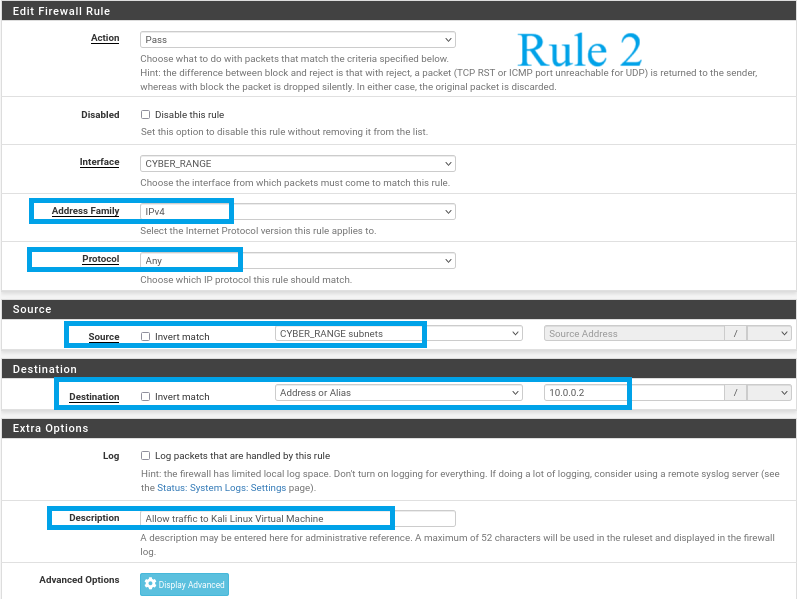
Rule 2
The rule has the following details:
Protocol: Any
Source: CYBER_RANGE subnets
Destination: Address or Alias - 10.0.0.2
Description: Allow traffic to Kali Linux VM
Scroll to the bottom and click on Save.
Click on the “Add rule to end” button to create a new rule.
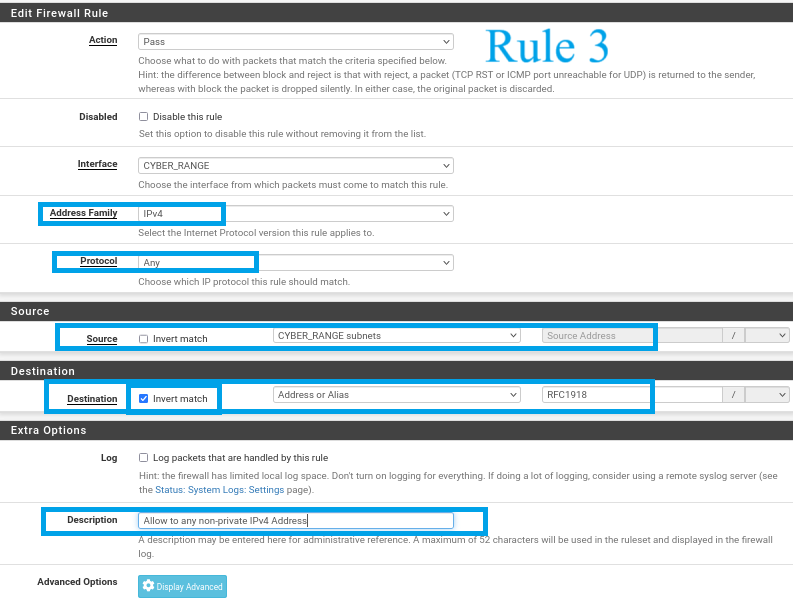
Rule 3
Create a rule with the following settings:
Protocol: Any
Source: CYBER_RANGE subnets
Destination: Address or Alias - RFC1918 (Select Invert match)
Description: Allow to any non-private IPv4 Address
Scroll to the bottom and click on Save.
Click on the “Add rule to end” button to create a new rule.
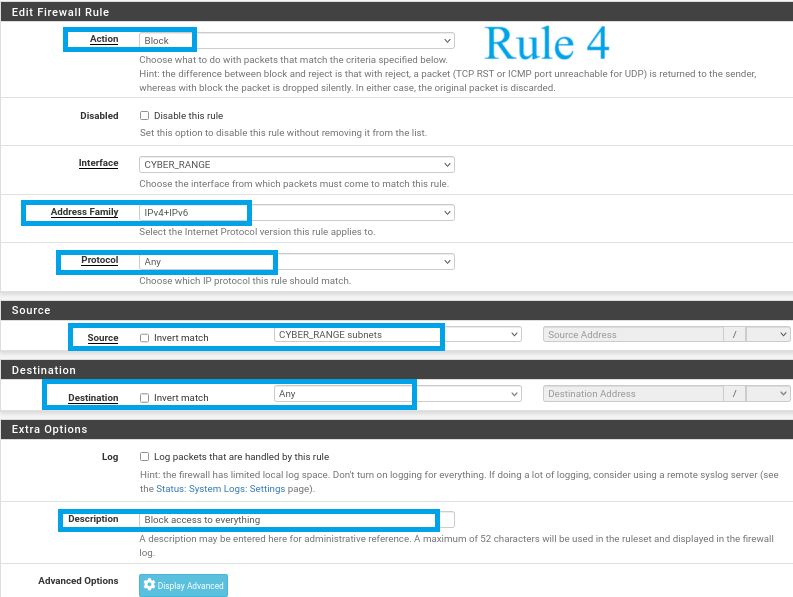
Rule 4
Create a rule with the following settings: Action: Block
Address Family: IPv4+IPv6
Protocol: Any
Source: CYBER_RANGE subnets
Description: Block access to everything
Scroll to the bottom and click on Save.
Image Ref. (click me!)
Click on the Apply Changes button at the top of the screen.
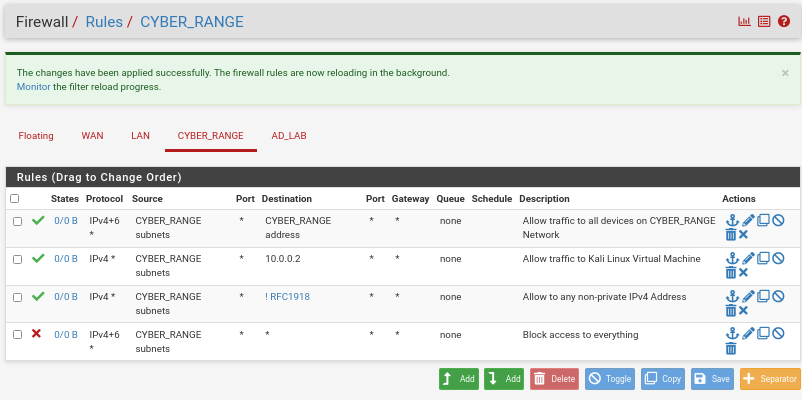
The final rules should look as follows:
AD_LAB Rules
Click on the AD_LAB tab in Firewall -> Rules. Use the “Add rule to end” button to create new rules.
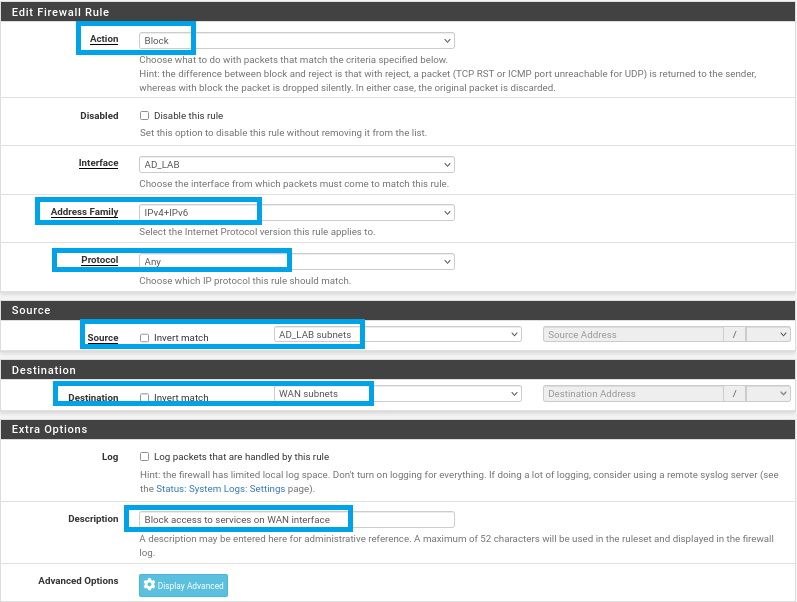
Rule 1
Create a rule with the following settings:
Action: Block
Address Family: IPv4+IPv6
Protocol: Any
Source: AD_LAB subnets
Destination: WAN subnets
Description: Block access to services on WAN interface
Scroll to the bottom and click on Save.
A popup will appear at the top to apply the changes, but dont click that until the rest of the rules are added.
Click on the “Add rule to end” button to create a new rule.
There will be 2 more rules added for this interface.
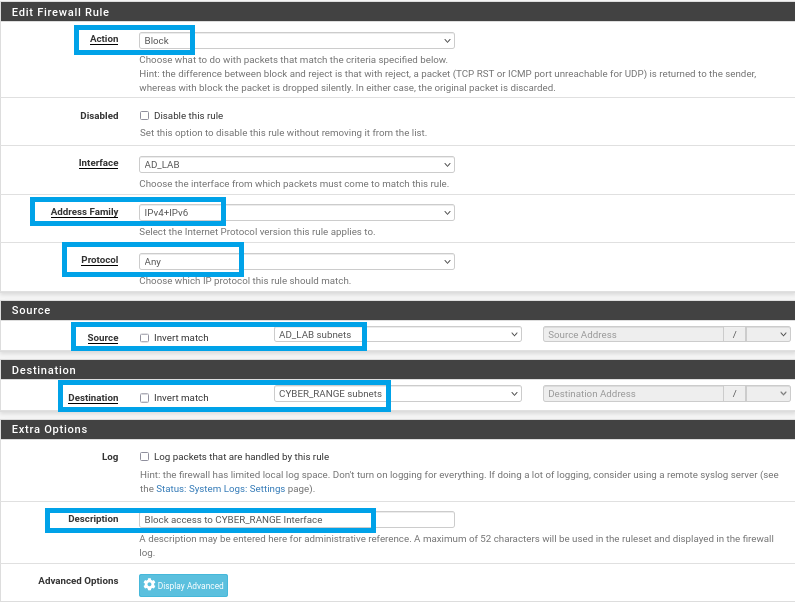
Rule 2
The next rule has the following details:
Action: Block
Address Family: IPv4+IPv6
Protocol: Any
Source: AD_LAB subnets
Destination: CYBER_RANGE subnets
Description: Block traffic to CYBER_RANGE interface
Scroll to the bottom and click on Save.
Click on the “Add rule to end” button to create a new rule.
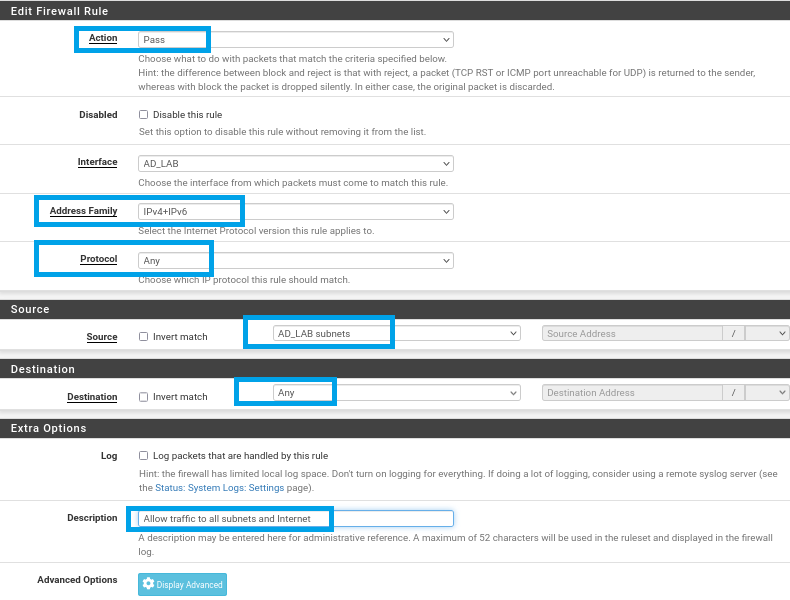
Rule 3
The rule has the following details:
Address Family: IPv4+IPv6
Protocol: Any
Source: AD_LAB subnets
Description: Allow traffic to all other subnets and Internet
Scroll to the bottom and click on Save.
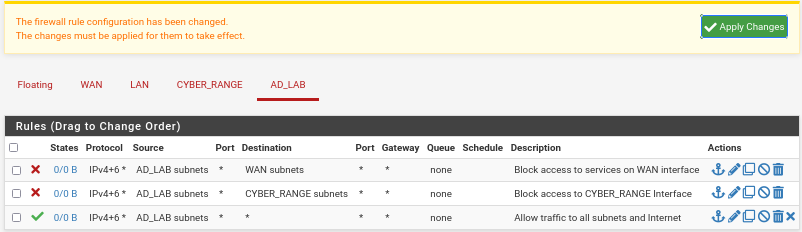
Click on the Apply Changes button in the popup at the top of the screen.
Image Ref. (click me!)
The final rules should look as follows:
pfSense Reboot
Now we need to restart pfSense to persist the firewall rules. From the navigation bar select Diagnostics -> Reboot.
Click on Submit.
Once pfSense boots up you will be redirected to the login page.
In the next module, we will add some vulnerable VMs to the CYBER_RANGE interface.